Step-by-Step Setup of Oracle GoldenGate Microservices Architecture 12.3 for Oracle
Step-by-Step Setup of Oracle
GoldenGate
Microservices Architecture
12.3
The brand new (12.3.0.1.4 released in May 2018) OGG (Oracle
GoldenGate) MA (Microservices Architecture) comes with distinct binaries, directory
structure, configuration and processes, completely different from the previous
releases (Classic Architecture). While we’re waiting for the next release for the
bug fixes in the product and confusion cleanup in the messages, logs and docs,
this article is trying to put everything together from multiple sources, and show
a complete step-by-step procedure, tested in a real business environment (not
in a lab), for initial and basic setup of the latest OGG MA for Oracle database
on Oracle Solaris SPARC and RedHat Linux.
1.
Goal:
Real-time data replication
·
Across platform: between Oracle Solaris SPARC
and RedHat Linux
·
Between different versions of Oracle DB:
11.2.0.4 and 12.1.0.2
·
Between Oracle DBs with TDE (transparent data
encryption) and without
2.
Environment
2.1.
Hosts
·
Source: waivoem01 (SunOS 5.11)
Ports open: 15000, 15010-15014
·
Target: waivawsdb01 (Red Hat Linux 7)
Ports open: 15000, 15010-15014
2.2. DBs
·
Source: XTTTEST (Oracle
11.2.0.4, existing)
·
Target: OGGTGT (Oracle 12.1.0.2, to be created)
2.3.
Replicated
Oracle DB schema: P1APP
·
Source: P1APP, default tablespace encrypted
(existing)
·
Target: P1APP, default tablespace non-encrypted
(to be created)
2.4.
OGG
MA
2.4.1.
Release:
12.3.0.1.4
2.4.2.
Mode:
Integrated Extract, Integrated Replicat
3.
OGG
MA Installation
ü Unzip the OGG MA zip file, and
run the installer.
ü This release divides the OGG binaries from the
configuration, traces and logs files, so we create 3 directories for OGG MA
(ogg_ma), Service Manager (ogg_sm), and the deployments (ogg_src for source,
and ogg_tgt for target) on both the source and target hosts.
3.1.
Source
(Install OGG MA for Oracle DB 11g in ogg_ma)
waivoem01:oracle:/clu01/app/oracle>
mkdir ogg_ma ogg_sm ogg_src
waivoem01:oracle:/>
/home/oracle/softwares/fbo_ggs_Solaris_sparc_services_shiphome/Disk1/runInstaller


Set up the environment variables:
export ORACLE_HOME=/clu01/app/oracle/product/11.2.0.4
export ORACLE_SID=XTTTEST
export OGG_HOME=/clu01/app/oracle/ogg_ma
export
LD_LIBRARY_PATH=$OGG_HOME/lib:$LD_LIBRARY_PATH
export TNS_ADMIN=$ORACLE_HOME/network/admin
export PATH=$ORACLE_HOME/bin:$PATH
3.2.
Target
(Install OGG MA for Oracle DB 12c in ogg_ma)
[oracle@waivawsdb01
oracle]$ cd /u01/app/oracle
[oracle@waivawsdb01
oracle]$ mkdir ogg_ma ogg_sm ogg_tgt
[oracle@waivawsdb01
~]$ /u01/Software/fbo_ggs_Linux_x64_services_shiphome/Disk1/runInstaller


Set up the environment variables:
export
ORACLE_HOME=/u01/app/oracle/product/12.1.0/dbhome_1
export ORACLE_SID=OGGTGT
export OGG_HOME=/u01/app/oracle/ogg_ma
export LD_LIBRARY_PATH=$OGG_HOME/lib:$LD_LIBRARY_PATH
export TNS_ADMIN=$ORACLE_HOME/network/admin
export PATH=$ORACLE_HOME/bin:$PATH
4.
Service
Manager and Deployment Creation
After the installation, create a Service Manager and
a Deployment on both the source and target hosts by running OGG Configuration
Assistant, oggsa.sh.
4.1.
Source
Create
a Service Manager and a Deployment for Extract.
waivoem01:oracle:/>$OGG_HOME/bin/oggca.sh
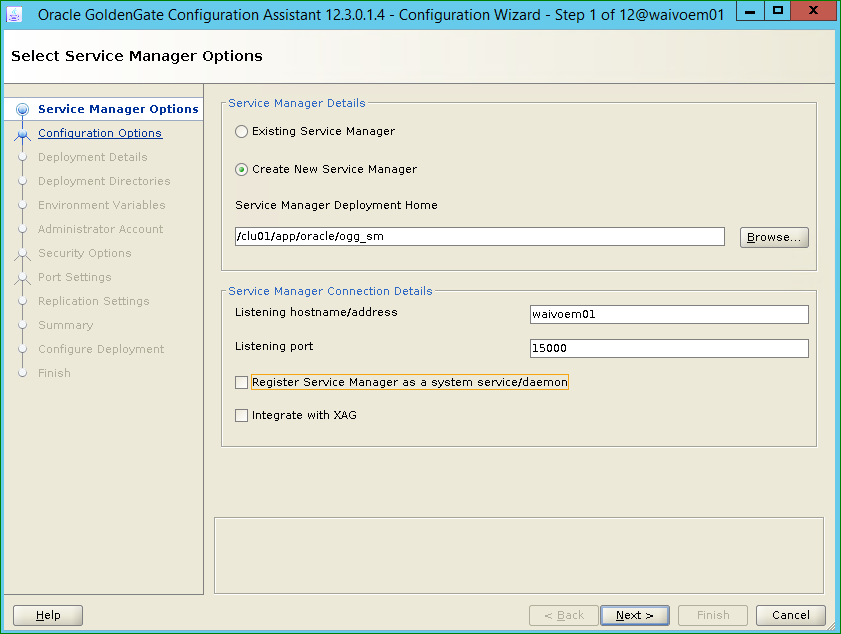


Deployment
home: ogg_src


The
username and password will be used for all the OGG servers.

Uncheck
SSL/TLS security for the initial setup:

Each
server needs a separate available port.

The
default schema will be created in the source DB later (in Step 7).


4.2.
Target
Create a Service Manager and a Deployment for
Replicat on the target with the similar configuration as on the source host.
[oracle@waivawsdb01 ~]$
$OGG_HOME/bin/oggca.sh


The
default schema will be created in the target DB later (in Step 7).


5.
Source
DB Preparation
5.1.
Add a dedicated entry for integrated Extract
in tnsnames.ora
OGG_EXT =
(DESCRIPTION
=
(ADDRESS =
(PROTOCOL = TCP)(HOST = waivoem01)(PORT = 1521))
(CONNECT_DATA =
(SERVER
= DEDICATED)
(SERVICE_NAME = XTTTEST)))
5.2.
Configure the DB for OGG
5.2.1.
Ensure
the DB is in archivelog mode.
5.2.2.
SQL> ALTER DATABASE ADD
SUPPLEMENTAL LOG DATA;
SQL> ALTER
DATABASE FORCE LOGGING;
SQL>
select SUPPLEMENTAL_LOG_DATA_MIN, FORCE_LOGGING from v$database;
SUPPLEME
FOR
--------
---
YES YES
SQL> ALTER
SYSTEM SWITCH LOGFILE;
SQL> alter system set
enable_goldengate_replication=true;
SQL> alter system set
streams_pool_size=500M scope=both;
5.2.3.
Patch OGG source Oracle 11.2 / 12.1 DB for bug
20448066
Shut
down the DB, apply patch 20448066, and restart the DB.
6.
Target
DB Preparation
6.1.
Add a dedicated entry for integrated
Replicat in tnsnames.ora
OGG_REP =
(DESCRIPTION =
(ADDRESS = (PROTOCOL = TCP)(HOST = waivawsdb01)(PORT
= 1521))
(CONNECT_DATA =
(SERVER = DEDICATED)
(SERVICE_NAME = OGGTGT)))
6.2.
Configure the DB for OGG
SQL> alter
system set enable_goldengate_replication=true;
SQL> alter system set
streams_pool_size=500M scope=both;
6.3.
Create the replication
schema
SQL> CREATE BIGFILE TABLESPACE encrypt_p1app_d_np2 DATAFILE SIZE 1G AUTOEXTEND
ON NEXT 100M MAXSIZE UNLIMITED;
SQL>
CREATE USER p1app IDENTIFIED BY P1APP#oggtgt#18# DEFAULT TABLESPACE encrypt_p1app_d_np2;
SQL>
ALTER USER p1app QUOTA UNLIMITED ON encrypt_p1app_d_np2;
SQL>
GRANT CONNECT, RESOURCE TO p1app;
SQL> ALTER
USER p1app DEFAULT ROLE ALL;
SQL>
GRATN CREATE TABLE TO p1app;
7.
Create
OGG user, OGGADMIN, in both source and target DBs
SQL> CREATE TABLESPACE oggadmin_dat DATAFILE SIZE
100M AUTOEXTEND ON NEXT 10M MAXSIZE 1G;
SQL> CREATE USER oggadmin IDENTIFIED BY
OGG#admin#2018 DEFAULT TABLESPACE oggadmin_dat;
SQ>> ALTER USER oggadmin QUOTA UNLIMITED ON
oggadmin_dat;
SQL> GRANT CONNECT, RESOURCE TO oggadmin;
SQL> ALTER USER oggadmin DEFAULT ROLE ALL;
SQL> exec
dbms_goldengate_auth.grant_admin_privilege('OGGADMIN');
SQL> GRANT ALTER ANY TABLE TO oggadmin;
SQL> grant select any dictionary to oggadmin;
8.
Create
a test table for replication in both source and target DBs
SQL> CREATE TABLE
p1app.oggtesting_tb
(OPS_NUM NUMBER NOT NULL,
OPS_DT TIMESTAMP(9) DEFAULT CURRENT_TIMESTAMP,
OPS VARCHAR2(10 BYTE),
OPS_MSG VARCHAR2(100 BYTE));
SQL> CREATE
UNIQUE INDEX p1app.oggtesting_tb_pk ON p1app.oggtesting_tb (ops_num);
SQL> ALTER
TABLE p1app.oggtesting_tb ADD (CONSTRAINT oggtesting_tb_pk PRIMARY KEY
(ops_num) USING INDEX p1app.oggtesting_tb_pk ENABLE
VALIDATE);
SQL> grant
select,insert,delete,update on p1app.oggtesting_tb to oggadmin;
9.
Integrated
Extract Configuration
Log in to the Service Manager on the source host.
URL: http://waivoem01:15000
Username: ogg_admin
Password: OGG#admin#2018

Click
on Administration Server:

Log
on to the Administration Server using the same OGG credential:

9.1.
Add credential for the source DB to
credential store
Click
on the Application Navigation icon in the upper left corner:

Select
Configuration, Database tab, then click on the + sign to add DB credential:

Enter
the required info, and click on Submit:

Click on right side DB
login icon to log in to the source DB:

9.2.
Add Trandata for the replication table
Click
on the + sign next to Trandata:

Select
Table, and enter the name of the replication test table:

After
clicking on Submit:

9.3.
Create an integrated Extract
In
Application Navigation area, select Overview, and click on the + sign to add
Extract:

Select
Integrated Extract, and click on Next:

Enter
the required info, and click on Next:
Process
Name for the Extract (up to 8 characters): p1appext
Trail
Name (2 characters): ex

Add
the parameter TABLE and the replication table name at the end of the parameter
file:

After clicking on Create:


10.
Add
Distribution Path on the source distribution server
A Path is equivalent to Data Pump in OGG Classic Architecture.
After logging in to the source Service Manager, click on Distribution Server:


Log in to the Distribution Server using the same OGG credential:


Click on the right side + sign to add a Path:


Enter the required info:
Path Name: p1app_pt
Source Extract name (P1APPEXT) and trail name (ex)
Target data transfer protocol: ogg
Target host name: waivawsdb01
Target Receiver Server port: 15012
Target trail name (2 characters): rp
Target Type: Receiver Server
Begin: Position in Log


After clicking on Create Path:


11.
Replicat
Configuration on the target host
Log in to the Service Manager on the target host.
URL: http://waivawsdb01:15000
Username: ogg_admin
Password: OGG#admin#2018

11.1. Add credential for the target DB to credential store
Click on Administration Server:


Log in to the Administration Server using the same OGG credential:


Click on the Application Navigation icon on the upper left corner:


Select Configuration:


Click on the + sign to the right of Credential, enter the required info and click on Submit:


Click on the right-side icon to log in to the target DB:


11.2. Create integrated Replicat
In Application Navigation area, select Overview, and click on the + sign to create a Replicat:


Select integrated Replicat and click on Next:


Enter the required info and click on Next:
Process Name for the Replicat: p1apprep
Credential Alias: oggadmin
Begin: Position in Log
Transaction Log Sequence Number: 0
Transaction Log RBA Offset: 0
Source: Trail
Trail Name: rp

Replace: MAP *.*, TARGET *.*;
with: MAP p1app.oggtesting_tb, TARGET p1app.oggtesting_tb;

After clicking on Create:


12.
Start
data replication
12.1. Populate the test table in the source DB
SQL> insert into oggtesting_tb values (1,current_timestamp,'Insert','The very first insert');
SQL> insert into oggtesting_tb values (2,current_timestamp,'Insert','The 2nd testing insert');
SQL> insert into oggtesting_tb values (2,current_timestamp,'Insert','Testing insert 3 by Kyle');
SQL> commit;
12.2. Check the test table in both source and target DBs;

12.3. Start the Extract


12.4. Start the Path


Also check the target Receiver Server for the status of the Path:


12.5. Start the Replicat:


12.6. Check the test table in the target DBs again:


13.
Test real-time
data replication
Run
some DML in the source DB and check the results in the target DB:


14.
Verify
that the goals are met
14.1.
The platforms
Source host:

Target
host:
14.2. The DBs


14.3. Oracle TDE:


The real-time replication is working, and all 3 goals have been met.
15.
Checking
status and using OGG Admin Client
15.1. Check status of the servers/processes
Source Service Manager:

Source Administration Server:


Source Distribution Server:


Source Performance Metrics Server:

Target Service Manager:


Target Administration Server:


Target Receiver server:


Target Performance Metrics Server:


15.2. Using OGG Administration Client on the source and target hosts
export OGG_HOME=/u01/app/oracle/ogg_ma
export OGG_ET_HOME=/u01/app/oracle/ogg_sm/etc
export OGG_VAR_HOME=/u01/app/oracle/ogg_sm/var


This concludes the initial and basic setup / configuration for real-time data replication
using OGG MA for Oracle which can be used as a foundation for further configuration /
testing to meet different business requirements.
posted by Kyle H @ June 28, 2018
3 Comments
![]()

3 Comments:
Very Useful article, Thanks For Sharing With Us
Here a related Stuff:
Adf Training In Hyderabad
Adf Online Training
Adf Training In Ameerpet
Adf Online Training
it is very informative and the best article
Thank you for sharing with us. It really helped me a lot!
https://fabricexperts.in/Fabrice Experts provides high-quality digital marketing, branding, and business growth solutions designed to help startups and small businesses stand out and scale with confidence.
Post a Comment
Subscribe to Post Comments [Atom]
<< Home